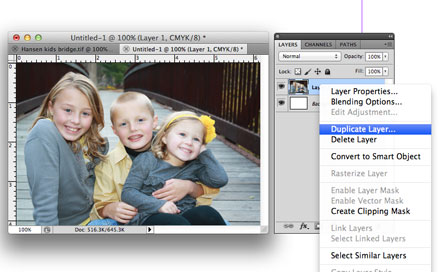
Now let's enhance those photos you have. You know the 1,000's of photos you take of your kids and never do anything with? Am I right?
Out of all of the pictures, look for the one that is natural. They could be crying, playing, maybe not looking at the camera, but it reminds you of their personality. That is the picture you want to enhance.
I love taking pictures and I love editing them to look better. People ask me all the time, "you need to teach me how to fix my photos." Today is the day peeps. I am going to do a little Photoshop training for you. Some do's, some don'ts.
First things first, let's talk Photoshop. It is the best photo editing software out there, hands down. If you don't have it, get it, or some version of it. It's not cheap, but you can do pretty much anything with Photoshop.
If you don't want to drop $300+ on Photoshop another option is Photoshop Elements a $68 version via Amazon.com. This tutorial will work with Photoshop Elements in the Expert mode. Don't worry, you will be an expert soon. Although the tutorial looks long, it's really only three steps. You can do it!
Now let's edit.
Open the photo you want to edit in your photo editing software.
Click on your Duplicated layer so that layer is selected (highlighted in light blue).
Under your Layers panel where it says Normal, click on the arrows and select Overlay.
NOTE: Play around with the other options in here. Depending on the photo you may like the Soft Light, Screen or Vivid Light better.
Notice how the color in the picture really pops? I think it pops too much so I adjusted the Opacity of that layer.
In your Layers panel, click on the arrow next to the number% in the Opacity: box and drop your opacity to a level you like.
The colors appear richer by using the Overlay feature.
To complete the photo I added a simple and subtle vignette. To add a vignette make a new layer.
Click on the little icon in the bottom of the Layers panel that looks like a pad of paper with a little fold. Just one click makes a new layer. Select the new layer so it is highlighted in light blue.
Select your brush tool. Once your brush tool is selected in the top menu bar there will be a number with an arrow (see picture below #1). Click on the arrow to have a drop down menu appear.
You want to select the size of your brush (#2) the size will depend on the size of your photo. You can test out your size by hovering your cursor over you photo.
To make the vignette you will want 0% Hardness (#3).
Now start drawing on the outside edges of your image by clicking your mouse to draw. You should still be on your newest layer.
Now you have a very harsh vignette. Please, please don't leave it like this! Let's soften it up by going back into the Layer panel and selecting Soft Light. You can adjust the Opacity as needed. I left it at 100%.
This will create a very subtle darkening around the photo.
Yea! You are done editing your photo!
What other photo editing tutorials would you like to see? How do you edit photos?


No comments:
Post a Comment