Tuesday, February 26, 2013

Hand drawn cards {Pinterest Challenge}

I am an avid follower of Young House Love and Bower Power. Two blogs that inspire me to be more creative, motivate me to decorate and encourage me to do more diy projects.

Recently they started a Pinterest Challenge which is basically a challenge to get-er-done. Stop pinning and start doing.
 
I had so many ideas in mind for this challenge, and you will see more of them soon, but I decided to showcase something easy, quick and very very inexpensive...hand drawn cards.

These cards would be great paired with a monogrammed board or can easily be put in a gift bag.


My Pin-spiration came from these pins:

Original source


Original source

Original source


I am terrible about buying cards for any occasion. I'm always purchasing them at the last possible minute, and when I finally do purchase the card(s), they are pricey. Plus, it's hard to find the perfect card for the occasion anyway and I thought this could be more personal and fun, and I guarantee you have all the materials in your house.

Materials needed:

Paper
Black pen
Colored pencils (optional)


The paper I used was from our daughters 100 sheet pad of paper of white card stock in 8.5 x 11 size. You can use any white paper or even colored paper if you want.


I folded the paper in half and creased it with my thumb. I kept folding it until it was easy to tear apart. I didn't cut it with a scissors because I like the torn edge look.


I folded the torn paper in half again using the same technique as mentioned above and tore the paper again. I was then left with four torn pieces of paper. To create the card, I just folded the torn paper in half and started drawing with a fine tip black ink pen.


I have to admit I was slightly scared that these wouldn't turn out, but then I just thought, no big deal, I can redo one on a different piece of paper. On my first card I drew a cupcake for a birthday card. The cupcake was slightly off center, so I added Happy Birthday to the right. Don't worry and don't practice, just free hand it! It's fun, quick and so easy. The more natural, the better!

Next use colored pencils (optional) (ours were from our daughters stash) to color in some elements of your drawing.


Remember your coloring and drawing don't have to be perfect. Just meaningful, right?


Pinterest Challenge complete. Pretty cute, don't you think? I don't think you need an envelope either. If you wanted, you could tie a ribbon around the card to add a little embellishment.

I have some other things to mention, there a couple new tabs at the top. Did you notice them? The projects tab is a work in progress. I am hoping to have a full page dedicated to all the projects on the Hansen Family Chaos blog. It's just taking me a while to get it organized. Remember, I have a full time job, most of this blog is done at night, when I have a spare moment. (ha, what's that?)

The other tab is a sponsor page. I'm really excited about this page, because it allows businesses to have an advertisement on The Hansen Family Chaos blog. The businesses can offer a giveaway which can drive more people to their webpage and most importantly increase their sales. If you are interested in being a sponsor please check out the sponsor page or email me at cyrenee76@gmail.com.

I can't tell you how many people I run into say, "I love your blog." Thank you all for reading, it has been a fun journey, and motivates me to get projects and decorating complete. If you really like this little blog, please share it with your friends or sign up to follow by email in the right hand column where it says FOLLOW BY EMAIL. I would be so grateful. (insert happy, happy face)

One last thing: If you are a blogger that stumbled upon the Chaos blog from the Pinterest Challenge, please share your blog and Pinterest project in the comments below. We all want to see more pin-spiration!

What have you created that was inspired by Pinterest?


Thursday, February 21, 2013

Awesome Apps: iPhone photography

I have discovered some really fun camera apps for the iPhone. I just had to share them with you. I found these great apps because of blogger Grumbles & Grunts. Admittedly, she is a much better photographer than I. Practice makes perfect!

original source


Camera+ is a great app for focusing and controlling exposure.


You can touch the screen where you want to focus and you can use a second touch to control the exposure. The second touch exposure tool basically adjusts the lighting of the photo.


original source

 Afterglow is a great app for filters. The possibilities are endless. You can add filters on top of filters, which most camera apps don't allow you do to. This one is really fun!


Both apps are $0.99 and well worth it. Camera plus does have a free version, but not as good.

Here are some photos I took using both of these apps.  Yes, I know I still have a LOT of work to perfect my photography skillz, but I had to share these. Can't wait to get some outside shots, c'mon Iowa weather, help me out with this!


 Black and White filter


Cropping filter


Faded filter


Retro filter


Adjusting saturation, highlights and shadows. Also cropped.


Sun kissed filter with right side filter overlay


Cropping and texture filter


 Cropping and left filter overlay


If you want more instruction on how to use your camera on your iPhone there is now a 4-week class. All online through Photojojo University. I haven't tried it, but thought I would share it.


Do you take photos with your iPhone or phone? What apps do you use?

Tuesday, February 12, 2013

Decorating the living room. We got a table, we need a lamp.

The decorating process seems to drag on and on. Buy something here, buy something there. Save a little money here, save a little money there. If you remember here our living room is our biggest challenge. Slowly we are buying furniture and filling the room with decorations.

We bought a table for under the stairs. It was a great find! We went shopping in Des Moines at Homemakers. There were so many to chose from, but we stumbled upon this in the clearance section. Originally $299 marked down over 60% and an additional 10% off. Bonus!


What I originally wanted from Ballard Designs cost $329 - $399 plus shipping and tax. It's beautiful right? But the sizes were off and we thought it may be a little too heavy for the room.


We weren't crazy about the silver knobs. A little to modern for our transitional/traditional room. So we found some extra kitchen knobs and switched 'em out.


Now it's just a little more subtle don't ya think? We are slowing adding decorations. Now I'm on the hunt for a fun lamp. I found a really awesome website where you can design your own lamp.


Here are some decorations that we are slowly adding.  I'll keep you all updated with more decorating photos as we go.


I have a couple DIY projects that I want to showcase on this table. I'm sure you will see those projects pop up on this blog some time in the future.

What is your favorite lamp? Do you have any lamp shops that you love?

Thursday, February 7, 2013

Easy peasy kids Valentine's Day treats: FREE PRINTABLES

Here are some cute Valentine's Day treats that are really easy to make.  And I've made it easier for you! You can download the file and print them out, voila!

Normally, I'm not this prepared for Valentine's Day, but Josh and I are headed to warmer weather next week, which means I have been preparing everything for the kiddos ahead of time.

Oh, I know what your thinking, she doesn't like Valentine's Day. Yes, yes, that is correct, but my kids love it. You can read more about my distaste in Valentine's Day here.

Glow Stick Valentine


Mustache Valentine


You can download the files above and personalize them by clicking on the photo and saving them to your desktop. How do I do that you ask?

  • Download the file.
  • Open Word.
  • Adjust your margins to 0" on all sides.
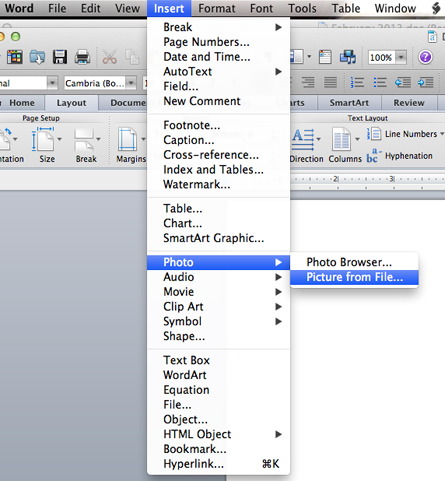
  • Go to Insert > Photo > Picture from file
  

  • Select file (file will insert into page)
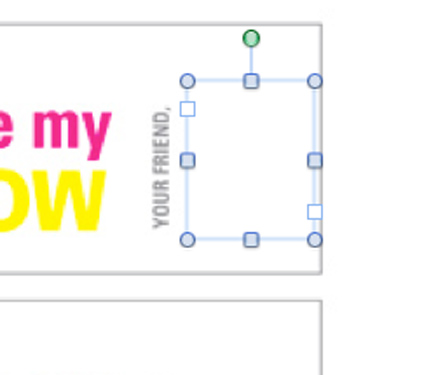
  • Go to Insert Text Box and place where you want  your name


  • Make sure your Text Box has No Fill and No Line
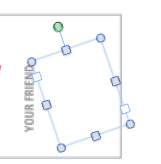
  • Rotate your Text Box for the Glow Stick Valentine by clicking on the green dot

  • Type name in the field (I would recommend using all Caps and a font like Arial for the glow stick valentine. I would recommend using all lower case and a font like Arial for the mustache valentine.)


Now your done with all your kids Valentine's. Easy, right?

What Valentine's did you make?


Tuesday, February 5, 2013

February goals: keeping it simple

 If you have been reading my blog lately you may have noticed that I started this year with some goals. I have been crossing off each project in January starting with all of our closets  (here.)

February is here, holiday and all. Ahhh Valentine's day, one of the two holidays that I cannot stand. I know your thinking, what girl doesn't like Valentine's Day? ME, that's who.  (The other holiday I cannot stand, you ask? Halloween)

I never really liked Valentine's Day, even in Elementary School.  When I was in third grade, during our Valentine's party, a boy chased me around the room trying to give me his Valentine, apparently I didn't want it. I was traumatized. Ha! 

Flowers? Sure, but not red roses, I prefer yellow roses. I would rather have a fresh bouquet of mixed flowers, and when it comes down to it, I would prefer we/he didn't drop the outrageous amount of cash on flowers on this holiday. Chocolate? Yes, I cannot live without, I eat it daily, yes daily.

In our house we don't celebrate Valentine's day, we celebrate our Valentine child. Our second born, Sawyer, was born on Valentine's day, 2002. We actually chose his birthday because I was induced and, at the time, I was very ready to "get the baby out." Our doctor was on-call Feb. 13, 14 and 15. The 13th was a Friday and we didn't want a Friday the 13th baby (everything bad goes through your head when you are pregnant, superstitions and all) and on Sundays, Feb 15, they didn't do inductions, Feb. 14 was "get the baby out" day.

It was a wonderful labor experience, everything went smoothly and the delivery was a huge celebration. We didn't find out the sex of the baby and we had a 16 mo. old girl (Sidney) waiting to be a big sister. I remember when he came out and the doctor said, "It's a boy!" I threw my hands up in the air like we just won a championship game. Josh and I were so excited to have a family of four, one girl, one boy. (Of course, I can't forget Kennady who was born in 2008)

Every year we celebrate his birthday on this lovey, dovey holiday. He wears it well. His birthday themes have been sports over the years and this year is no exception. Here are some of my favorite pictures of Sawyer.


Enough about Sawyer's birth story and on to some goals. January's goals were pretty hefty, I completed most of them, but February is a little more busy with kids sports, Sawyer's birthday and Josh and I are taking a vacation.

Without further ado...


February Goals


  • Prepare for taxes (I laugh a little at this, because I don't do much. Josh does it all.)
  • Clean all baseboards
  • Schedule annual Dr. exams/physicals for myself
  • Organize laundry room closet
  • Finish Sidney's wall art collage in her room
  • Start decorating in living room (specifically, under the stairs)
There it is, my February Goals. They are out there for you all to see. Gotta go, I better get started.


Sunday, February 3, 2013

Wow chaos times 10,000! Plus a Thank You giveaway.


**This contest is now closed**


I'm doing a celebratory dance right now (can you see me?). This is a pretty exciting day. My little blog has reached 10,000 page views, cue happy dance. For a little blogger like me, this is a BIG deal.

Some of you may laugh, because bigger bloggers like Young House Love, Bower Power, Iowa Girl Eats and All Things Thrifty probably get 10,000 page views A DAY. Craziness.

Thank you, all of you, who read my little chaotic blog. I really appreciate you, I do, I do!

Now for the giveaway. As a thank you for reading my blog, I am going to giveaway one 16 x 20 typography sign. You can view more of them here.


To enter to win 1, 16 x 20 print, leave a comment below that you shared my blog with your friends on Facebook, through email or any other social media source, by Thursday, Feb 7, before 5:00 PM central standard time zone. I will select a random person from the comments below as the winner.

I will announce the winner Monday, Feb 11 after 5:00 p.m.  If you don't win.  Don't worry, I can still make your personalized typography sign just email me at cyrenee76@gmail.com!

UPDATE: After putting the below names into Random.org, the winner is Carrie! Carrie contact me with your information and I will design a personalized 16 x 20 typography sign for you. Thanks for reading Hansenfamilychaos!


Blogging tips